Affiliate links on Tech Countless may earn us a commission. Learn more
2 Best Ways to Backup and Restore Windows Registry

What is Windows Registry?
Windows Registry is a database that stores low-level settings for installed software, apps, and the operating system. It contains hardware settings, user preferences, and system configuration. The Windows registry also gets updated when you install software or update Windows, among many other scenarios.
Registry Editor is a built-in utility tool in Windows that allows you to view, update, and manage the Windows registry.

It has different branches:
- KEY_CLASSES_ROOT: Contain file associations and information about registered applications and file types.
- HKEY_CURRENT_USER: Save settings related to the logged-in user, like environmental variables, application settings, desktop settings, etc.
- HKEY_LOCAL_MACHINE: Store data about installed software, hardware and security settings.
- HKEY_USERS: Contain individual user profiles and their settings for all users in that particular machine.
- HKEY_CURRENT_CONFIG: It stores info about the current hardware configuration of the system.
Why to Backup Registry?
Backup is important for the Windows registry because if, by mistake, anything goes wrong with the operating system, it may be possible that your Windows OS will not function properly or even not start, so before making any changes to registry files or installing software, it is better to take a backup of the registry.
You don’t necessarily need to restore it after creating a backup; the only time you need to restore it is when your PC does not function properly or facing some errors, or you know that you modified the registry before this.
Best Ways to Backup and Restore Windows Registry
1. Using Windows Registry Editor
Backup Process:
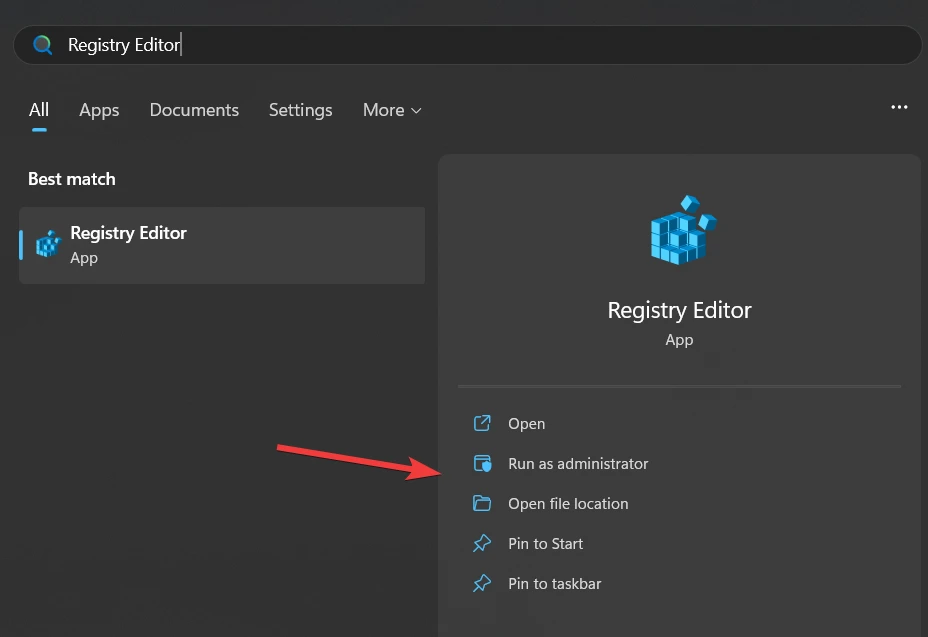
1. Press the Windows key and search for Registry Editor, then choose Run as administrator.
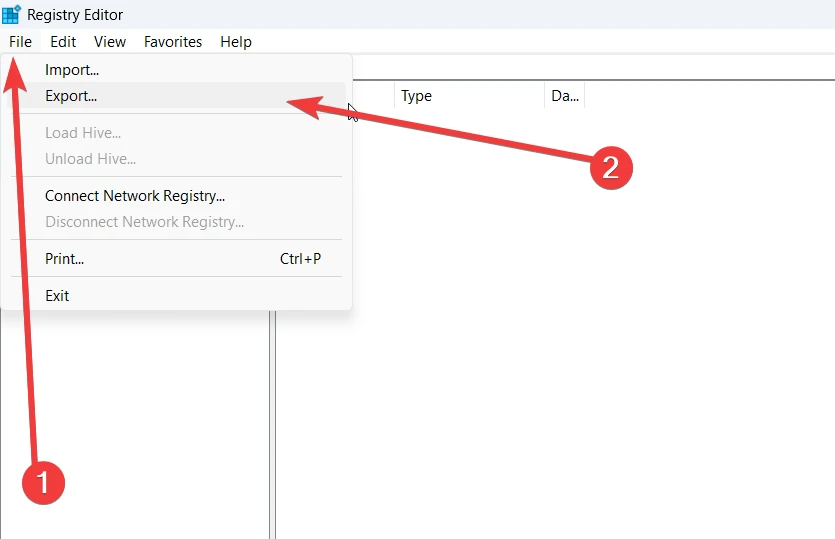
2. Click on File, then choose Export.
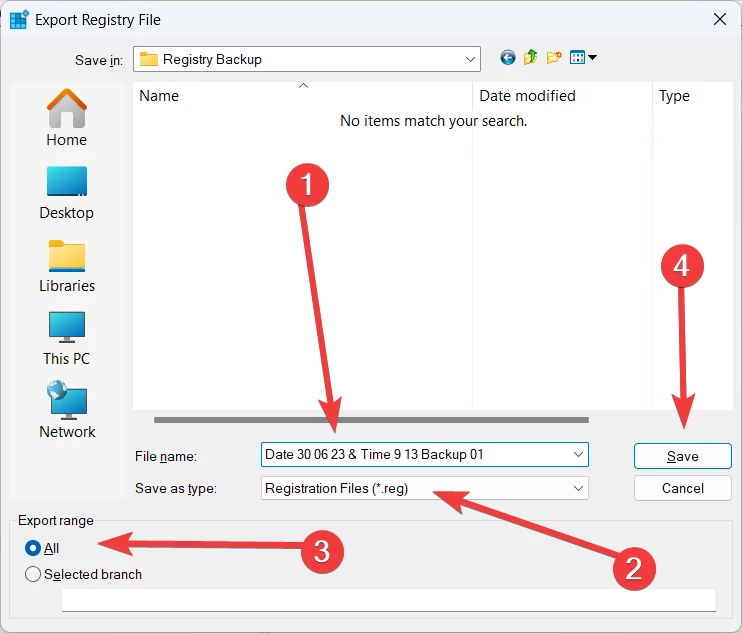
3. Now give it a file name. We recommend adding the date and time as well to get more ideas about your registry backup. Save it as Registration Files (*.reg). Also in the export range, Select All to backup the entire Windows registry.
Tips:
Tip 1: Also, do not save your registry backup on C Drive (where the OS is installed), but store it on another drive so your registry files will stay safe if something wrong happens with your PC.
Tip 2: You can also export the selected branch by selecting it, then right-clicking and selecting export and saving it. But generally, backing up the whole Windows registry is enough.

Restore Process:
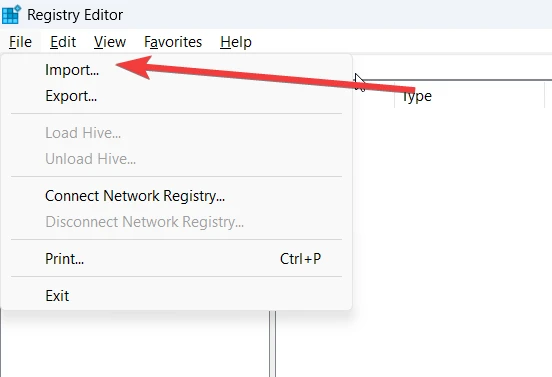
Using Registry Editor: Open the registry editor again, choose the file, and then click on Import. Choose the registry file that we backed up, and it will successfully be restored.
Easy Way to Restore: You can simply double-click on the backed-up .reg file, and it will ask, Are you sure you want to continue? Then choose yes, and your Windows registry files get restored.

Also Read: Software For New Windows Laptop
2. Using System Restore Point
When you create a restore system point, it takes a snapshot of important computer system files and Windows registry files. So this way, we are able to take backups of registry files as well.
Backup Registry Using Restore Point:
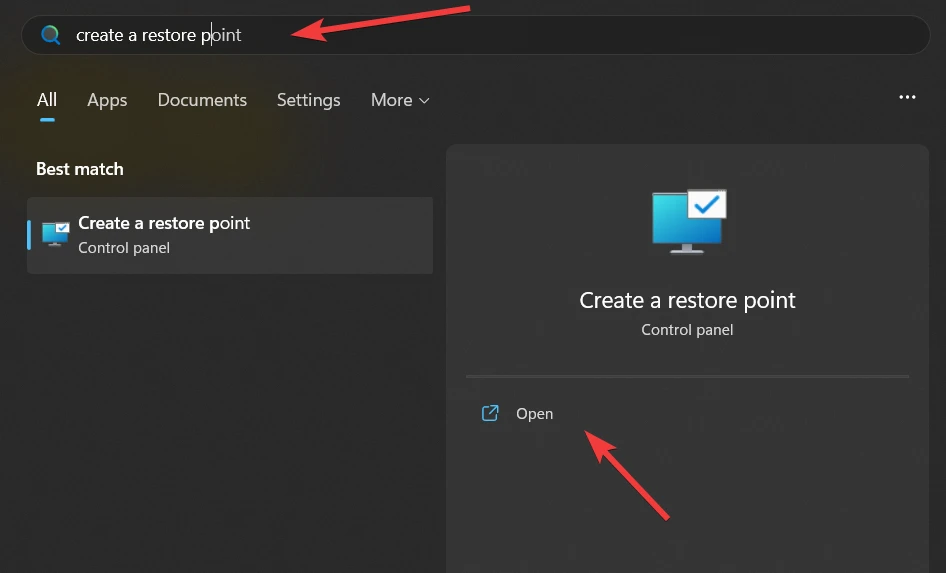
1. First, search for Create a restore point and open it.
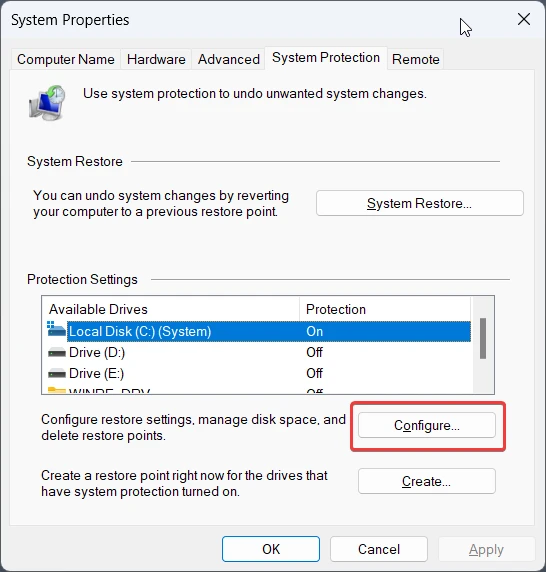
2. Choose the Configure option.
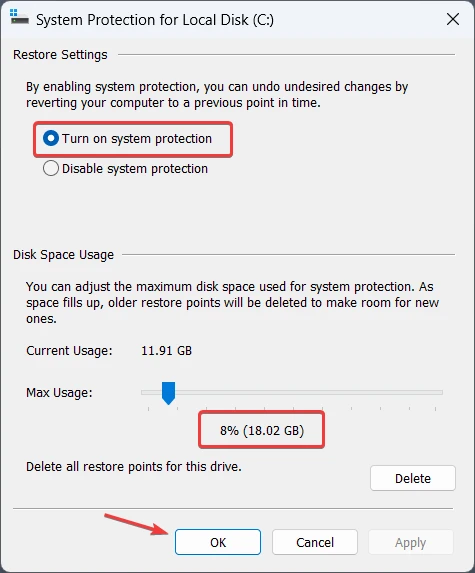
3. Make sure to Turn on system protection and set Max Usage as per your needs. We set it to 8% and then hit OK.
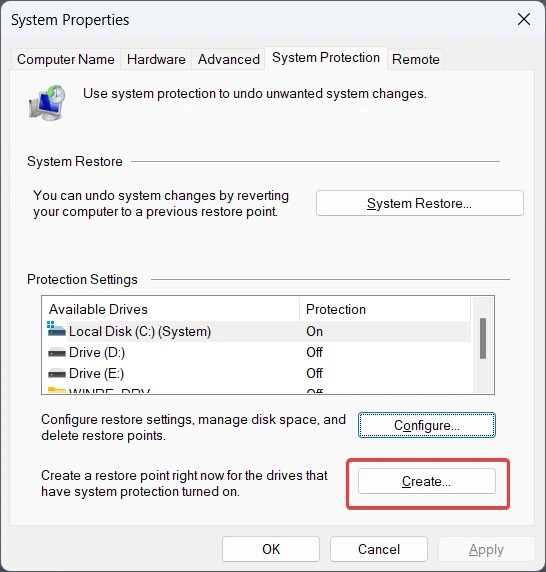
4. Now, from the restore point option, click on Create.
5. Name your restore point: We generally suggest adding date and time to restore points as well to get a better idea of when they were created.
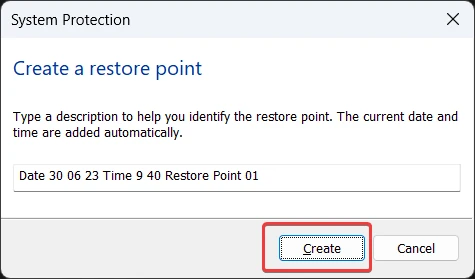
6. It will take a little time to create a restore point, and then you get this message: The restore point was created successfully.
Information: Windows automatically creates a system restore point after a Windows update, when you install new software, add new hardware, and in many other cases, so if bad things happen with your PC, you are able to use the restore point to go back to the previous state when your PC was running perfectly.
Steps to Restore:
If you are able to access your PC:
1. Search for Recovery, then open it.
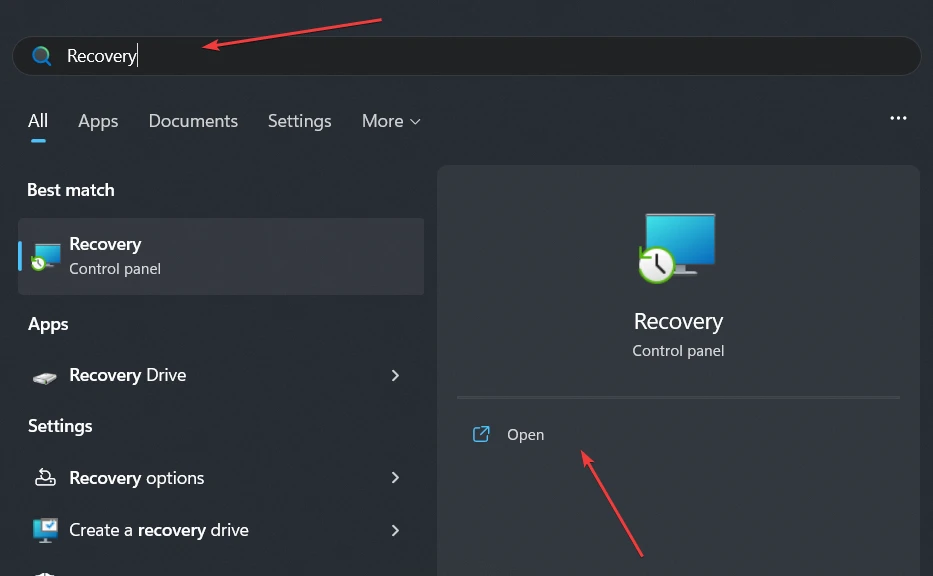
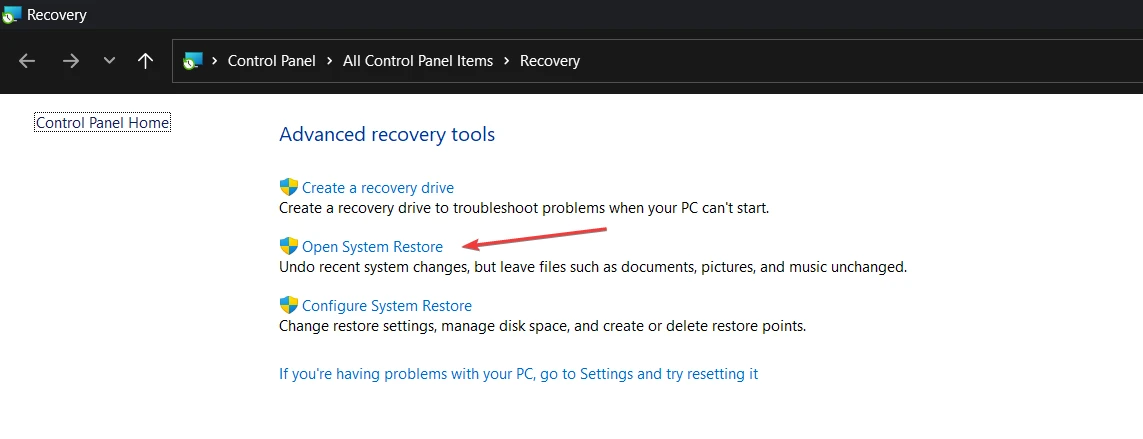
2. Then click on Open System Restore.
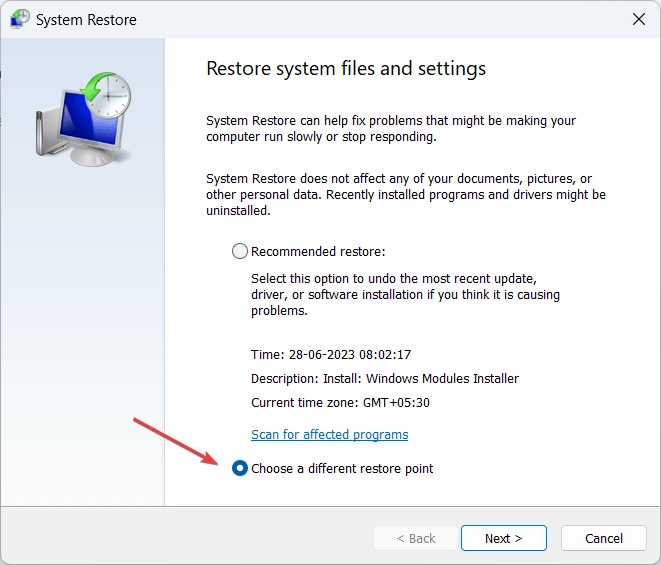
3. Now Choose a different restore point.
4. Choose the restore point that you created previously. You can also enable show more restore points.
One thing to note here is that if you found lot of restore point then all remaining restore points that you have not created from your side are created by Windows itself or by other utility software for safety purposes.
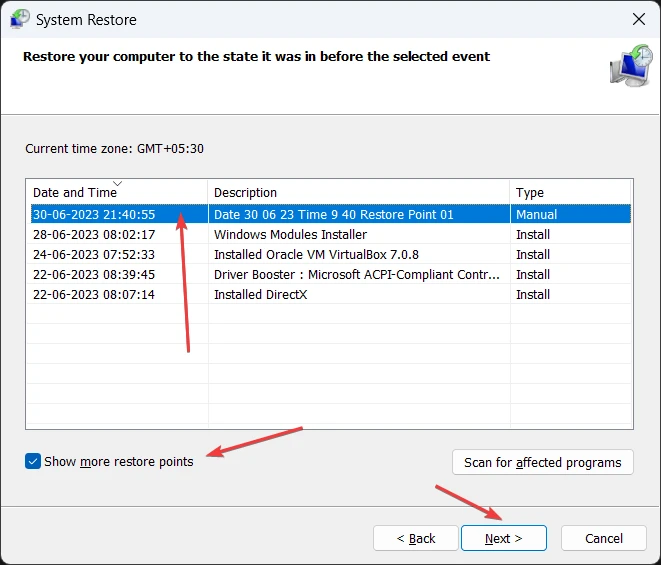
5. We generally recommend choosing the most recent restore point and then clicking on Next.
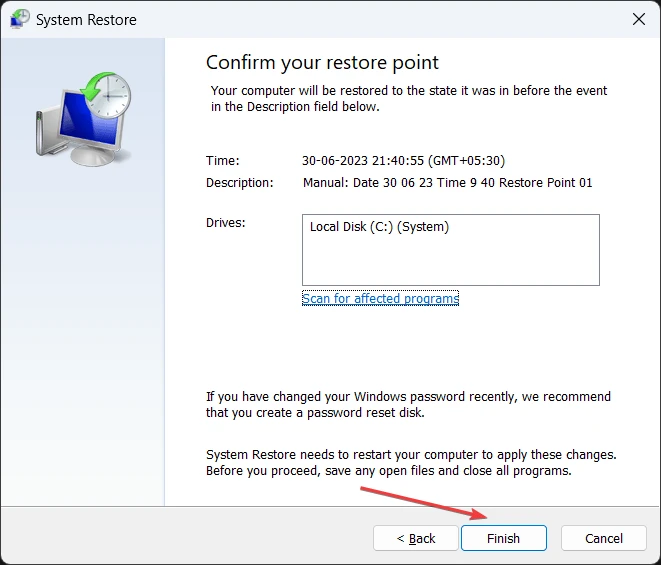
6. After that, choose Finish to go back to the previous state of Windows when a restore point is created.
Useful Read: How to Turn Off Search the Web Results in Windows Start Menu
What if you are not able to access your PC properly?
You need to somehow open advanced options. The easiest way to do that is to add the Windows installation media disc to the PC and boot from that disc.
After selecting language, click Next, then go to Repair Your Computer and select Advanced Options. Next, choose Troubleshoot, then System Restore, and follow the above mentioned steps from 3 to 6.
